
Model Number:
MIP
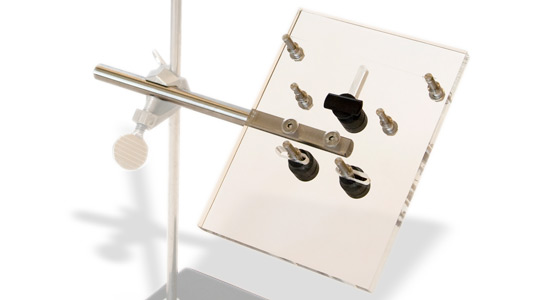
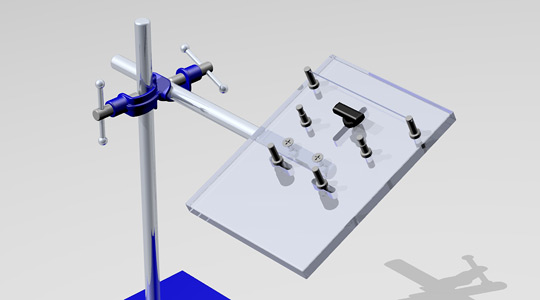
Intratracheal intubation of anesthetized mice can pose challenges due to the animal’s small size, unique anatomy and the difficulty in visualizing the epiglottis. Researchers performing intratracheal aerosol administration in mice with Penn-Century’s unique MicroSprayer® Aerosolizer and Dry Powder Insufflator™ face similar challenges. The Penn-Century Mouse Intubation Platform is designed to make intratracheal aerosol delivery or other intubation procedures in mice far safer, faster and easier. It is simple, durable, easy-to-use system for supporting the anesthetized mouse securely during intubation and/or insertion of our aerosol delivery devices.
- Solid Plexiglass®/Perspex® base and stainless steel support rod, attaches to any standard laboratory clamp stand (not included)
- Unique adjustable neck support can be swiveled to maximize view of the trachea.
- Stainless steel posts with plastic “wire” maintain the anesthetized animal in the correct position for intubation, suspended from the front incisors
- Two fixed side posts and two adjustable posts permit the user hold the mouse securely in place
- Platform: Solid Plexiglass®/Perspex® with stainless steel and Delrin® fittings.
- Platform dimensions: 4.5″ x 6 1/8″ x 3/8″ (15 x 23 x 6 cm)
- Stainless steel support rod: 8″ (20 cm)
- Weight: 15.6 oz with support rod – 450 gr
- Accessories: Accessories include the nylon wire for suspending the animal, hex wrench, rubber bands, additional nylon wire and screws.
- Cleaning: May be cleaned with ethanol or Clorox® /Clidox® and re-used.
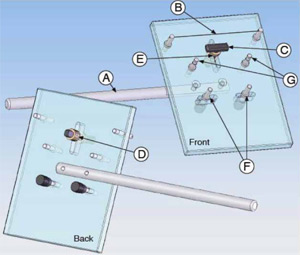
- A: Stainless steel support bar can be securely clamped to any standard lab base and adjusted to any angle
- B: Stainless steel posts with plastic wire (provided) for suspending anesthetized animal by incisors
- C, D, E: Adjustable Delrin® Neck Support (D = rear view)
- G: Upper stainless steel guide posts with rubber bands keep animal securely in position
- F: Adjustable stainless steel side posts hold the animal securely in place and prevent lateral movement
All materials can be sterilized with standard methods.
NOTE: The support bar can be attached to any standard laboratory clamp stand. (Not included with the platform.)
Mouse Intubation Platform – User Instructions. For additional details, see Instructions for Use of Mouse Intubation Platform (MIP)
To assemble:
- Unscrew the screws attached to the end of the steel support bar (A) using the small hex wrench provided.
- Line up the holes on the steel support bar with those on the base of the platform, and insert the screws up through the base into the steel bar.
- Tighten screws with hex wrench firmly, but not with excessive force – until the top of the screw is even with the surface.
- The platform is designed to be attached to a standard laboratory holder-clamp setup (not provided). Clamp the bar in place and position the platform and bar angle as desired.
For intubation procedures:
- Position the anesthetized mouse so that it is suspended from its front incisors on the nylon wire provided (B). This wire can be sterilized after each use. Additional replacement wire is provided.
- To adjust the rectangular neck support bar (C), reach under the platform and loosen the black Delrin® knob (E) from below. Slide the neck support up or down or swivel it to the desired position and retighten the knob.
- If the animal is especially large, you may remove the neck support completely by unscrewing the knob below all the way until it comes off of the post to which it is attached. NOTE: This platform is not designed for use with standard laboratory rats.
- The two middle steel posts (G) are intended to secure the animal across the chest with a rubber band. Several extra rubber bands are provided. Simply attach the rubber band to one post, pull it across the mouse’s chest and attach to the opposite post. Adjust as needed.
- The two lower steel posts are to secure the mouse on its back and prevent lateral movement while anesthetized. They may be adjusted from right to left as needed. To do so, loosen each post one by one (F) by reaching below and unscrewing the black knobs while grasping the circular nuts above the platform. Slide the posts to fit the width of the animal without applying pressure on it. To tighten the knobs, hold the silver circular nuts in place with one hand while tightening the knob from below with the other.
Cleaning instructions:
- The entire Plexiglass®/Perspex® base and all the fittings maybe cleaned with ethanol or a dilute solution of (e.g. Clorox® /Clidox®). The device may be immersed in the solution and/or it may be applied generously with a paper towel, sponge or soft cloth. Do not use abrasive pads, or common glass or window cleaners that contain alcohol or ammonia – such as Windex™ which can harm the surface. Do not autoclave the device or subject it to high heat as this will cause it to warp.
- The nylon “wire” can be cleaned and re-used. Additional wire is provided. The stainless steel posts and the Delrin® fittings can be wiped clean with a damp cloth, using ethanol or (e.g. Clorox® / Clidox®).
- Dry the platform with a soft, lint-free clean cloth.